AI编程系列:MCP服务开发实践-yapi文档读取
发布时间: 2026-03-30
前言
现在公司之前没有一个统一管理API的地方,最近他们搭了一个开源的项目在内网,我每次要从这个API网站上去人肉copy文档喂给大模型,我觉得有些麻烦, 于是我开发了一个MCP服务,让模型可以自行读取最新的API文档,自行决策。
架构
我采用NodeJs的 @modelcontextprotocol 编写服务,原本想直接通过Node登录YApi之后,导出所有接口,
后来想导出之后缓存的更新、同步会带来一些使用上的麻烦,于是还是设计成了通过http接口登录,在内存中维护登录状态,然后
再调用其他接口查需要用得接口的信息,通过了Node写了几个工具:
yapi_status: 检测yapi登录的相关状态list_projects: 获取有哪些项目list_categories: 获取项目分类get_api_detail: 获取某个api详情search_apis: 通过关键词查找apiexport_project: 导出所有api,用于大模型离线分析
关键实现
- 做模拟http请求时要保持好cookie的信息,在每次请求都带上,有新的cookie也要同步到内存中
private async rawRequest(
    pathname: string,
    init: RequestInit,
    query?: Record<string, string | number | boolean>
  ): Promise<{ response: Response; value: unknown }> {
    const response = await fetch(this.buildUrl(pathname, query), {
      ...init,
      headers: {
        accept: "application/json, text/plain, */*",
        ...(this.cookies.size > 0 ? { cookie: this.serializeCookies() } : {}),
        ...(init.headers ?? {})
      }
    });

    this.captureCookies(response);
    const text = await response.text();

    return {
      response,
      value: parseResponseBody(text)
    };
}- 使用@modelcontextprotocol的定义tool
// 使用registerTool来注册你的工具
    registerTool<OutputArgs extends ZodRawShapeCompat | AnySchema, InputArgs extends undefined | ZodRawShapeCompat | AnySchema = undefined>(name: string, config: {
        title?: string;
        description?: string;
        inputSchema?: InputArgs;
        outputSchema?: OutputArgs;
        annotations?: ToolAnnotations;
        _meta?: Record<string, unknown>;
    }, cb: ToolCallback<InputArgs>): RegisteredTool;

// eg
server.registerTool(
    // 工具名字
  "get_api_detail",
  {
    // 描述,很重要,大模型会依据描述来决定调不调
    description: "描述一下你这个工具的作用",
    // 输入参数定义
    inputSchema: {
        // 描述也比较重要,让大模型知道参数的作用
      interfaceId: z.number().int().positive().describe("Numeric YApi interface id. If provided, it is used directly and path-based resolution is skipped.").optional(),
      projectId: z.number().int().positive().describe("Numeric YApi project id used with path-based API resolution. Takes precedence over projectName.").optional(),
      projectName: z.string().trim().describe("Human-readable YApi project name used with path-based API resolution when projectId is not provided.").optional(),
      path: z.string().trim().describe("Full API path inside the selected project, for example /vega-os-platform/v1/app/list.").optional(),
      method: z.string().trim().describe("Optional HTTP method filter such as GET or POST when resolving by project and path.").optional(),
      refresh: z.boolean().describe("Bypass in-memory cache and fetch the latest API detail from YApi.").optional().default(false)
    }
  },
  // 异步函数返回调用结果,就是你工具对应的具体逻辑
  async ({ interfaceId, projectId, projectName, path, method, refresh }) => runTool(() => service.getApiDetail({ interfaceId, projectId, projectName, path, method, refresh }))
);
// 返回结果是由格式要求的
function textResult(value: unknown): { content: [{ text: string; type: "text" }] } {
  return {
    content: [
      {
        type: "text",
        text: toJson(value)
      }
    ]
  };
}
它的入参枢通过zod来实现定义
有了 Zod,一行定义 = 校验 + 类型 + 文档
z.boolean().optional().default(false)出参是一个content数组,支持返回多个content,type分类有
- text 文本
- image 图片
- resource 二进制文件
我们这里主要使用文本
使用效果
我在对话中问 帮我查一下yapi接口文档中设备管理的接口
然后通过一系列调用tool之后得到输出
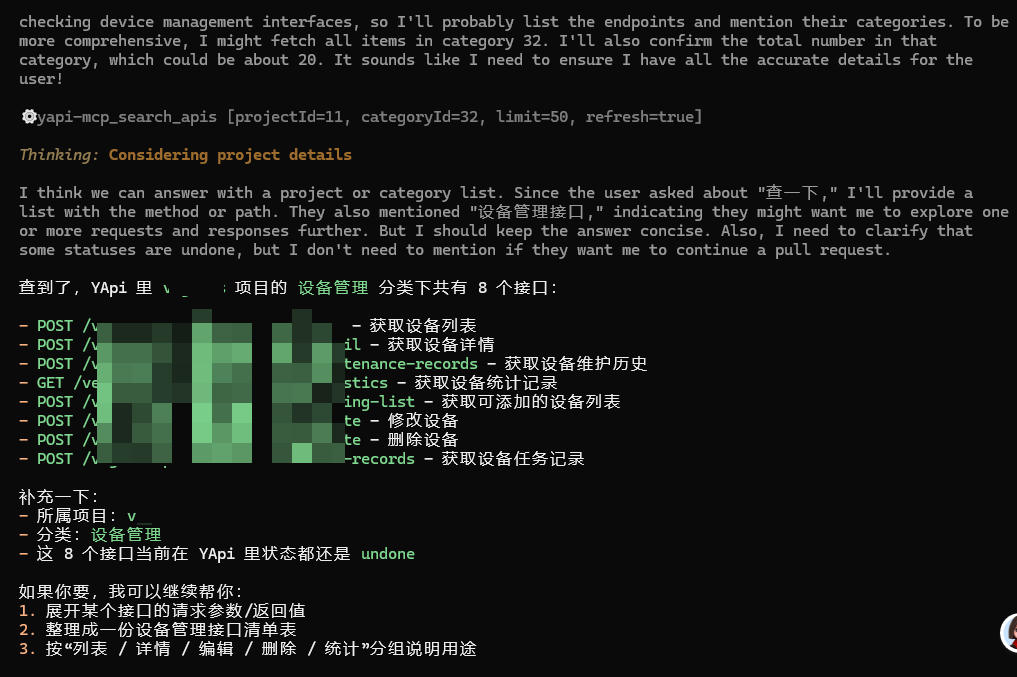
说明服务正常运行!
使用方式
我们开发的MCP服务,怎么投入使用?
通常有2种方式,一个适合本地开发调试你的MCP服务,一个适合发布之后给其他人分享。
本地运行
本地运行,开发好后代码不用管,直接在你的编程软件配置mcp服务,指向你的代码目录中,用什么工具运行什么文件。
首先构建
npm run build将以下配置添加到你的开发工具中:
// 不同的工具这个配置名字不一样,这是opencode的配置方式
{
  "mcp": {
    ....其他mcp服务...
    "yapi-mcp": {
      "type": "local",
      "command": ["node", "/xxxxx/dist/index.js"],
      "enabled": true,
      "environment": {
        // 改成你的yapi部署地址
        "YAPI_BASE_URL": "https://yapi.example.com",
        // yapi登录账号
        "YAPI_USERNAME": "your-account@example.com",
        // yapi登录密码
        "YAPI_PASSWORD": "your-password"
      }
    }
  }
}
这是trae的配置方式
{
  "mcpServers": {
    "yapi-mcp": {
      "command": "node /xxxxx/dist/index.js",
      "env": {
        // 改成你的yapi部署地址
        "YAPI_BASE_URL": "https://yapi.example.com",
        // yapi登录账号
        "YAPI_USERNAME": "your-account@example.com",
        // yapi登录密码
        "YAPI_PASSWORD": "your-password"
      }
    }
  }
}
发布安装
如果你的MCP服务想让别人也使用,就需要发布
npm run build
npm config set registry https://registry.npmjs.org/
npm login
# 根据web登录授权后
npm publish
最后就是安装MCP,现在就不要使用目录地址指向js文件了
// 不同的工具这个配置名字不一样,这是opencode的配置方式
{
  "mcp": {
    ....其他mcp服务...
    "yapi-mcp": {
      "type": "local",
      // @npmjyj/yapi-mcp 就是你发布的包名
      "command": ["npx", "-y", "你的包名"],
      "enabled": true,
      "environment": {
        // 改成你的yapi部署地址
        "YAPI_BASE_URL": "https://yapi.example.com",
        // yapi登录账号
        "YAPI_USERNAME": "your-account@example.com",
        // yapi登录密码
        "YAPI_PASSWORD": "your-password"
      }
    }
  }
}
这是trae的配置方式
{
  "mcpServers": {
    "yapi-mcp": {
        // @npmjyj/yapi-mcp 就是你发布的包名
      "command": "npx -y 你的包名",
      "env": {
        // 改成你的yapi部署地址
        "YAPI_BASE_URL": "https://yapi.example.com",
        // yapi登录账号
        "YAPI_USERNAME": "your-account@example.com",
        // yapi登录密码
        "YAPI_PASSWORD": "your-password"
      }
    }
  }
}
最后编辑于